I may not be new to this whole blogging thing, but I am new to using Lightroom to edit my blog photos! For the first four years of my blog I was only using iPhoto or Flickr to slightly tweak the brightness, saturation and sharpness of my photographs, then on a whim one day after talking to a blogger friend of mine I downloaded Lightroom and my whole world changed. When I initially downloaded it I was SO overwhelmed, there are so many things I didn't understand and I almost gave up. Then one day I stumbled on the wonderful world of Lightroom Presets and Dreamy Presets made my photo editing process not only so much easier, but SO much faster! Before buying one of the Dreamy Presets Lightroom packages I thought about what my ideal blog photos would look like. I like my outfit photos to be bright, colorful and crisp so the Santorini Collection was perfect for me. As with any other Lightroom preset, you still need to slightly adjust the levels of your photo once you apply it, but a process that once took forever, now takes half that time!
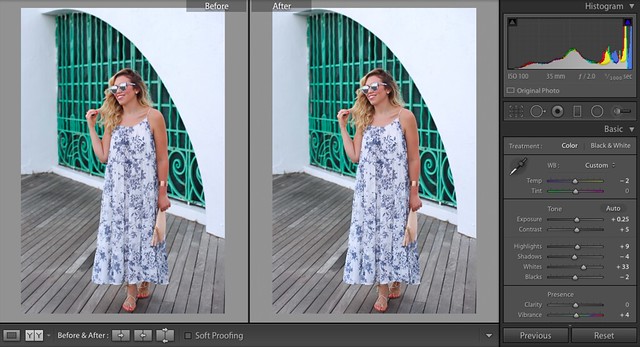
For these photos there wasn't too much I had to do to get them where I wanted, but I definitely knew I wanted to cool down the photo a tiny bit and brighten everything. I started by applying the Santorini Soft Skin + preset which smoothed out my skin while simultaneously brightening it, followed by the Santorini Tone Neutral +++ and Santorini Vibrance +. Once everything way applied I slightly adjusted the levels on the right and it was perfect! I'm not a huge fan of super edited photos so I love how I can customize these presets to work for me!
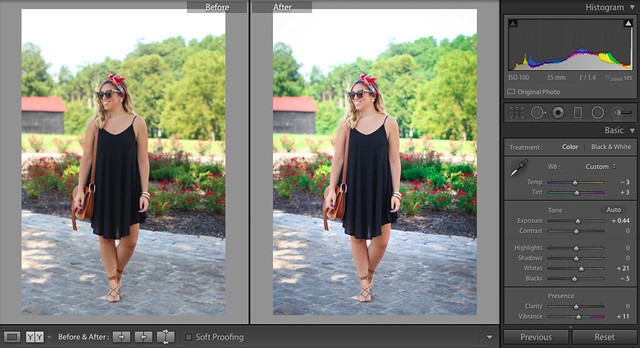
Now this photo needed a little bit more work than the previous one. The coloring was way off and the photo in general way too dark for me. I started my applying the Santorini Spotlight + first which brightens the center of the photo and darkens the edges. Then I applied Santorini Vibrance + to enhance the colors of the photo. From there I made a few more adjustments, like taking out the yellow tone of the trees and adding a slightly pink tone to the photo.
Like I mentioned above I'm no expert when it comes to editing photos, but adding a Lightroom Preset Collection, like Dreamy Presets, to my editing process has made my life a LOT easier and has truly made me understand more about Lightroom and all the amazing features it has!
If you have any other questions feel free to email me and me a comment if you're interested in me doing more posts like this!
Disclaimer: This post was sponsored by Dreamy Presets, but all opinions are my own. I purchased one of their Lightroom Preset packages months before writing this post! Thank you for supporting brands that make this blog possible.